 how-to
How to Keep Frozen Desserts Cold Outdoors: 7 Steps
Table of Contents
- Step 1: Prep Your Frozen Desserts and Containers Before You Pack
- Step 2: Pre-Chill Your Cooler and Build a Cold Source Plan
- Step 3: Pack the Cooler So Every Dessert Stays Cold
- Step 4: Using Dry Ice to Keep Desserts Cold (and Doing It Safely)
- Step 5: Set Up an Outdoor Serving Station Without Electricity
- Step 6: Know Your Temperature Targets and Time Limits
- Step 7: Troubleshoot Melting, Condensation, and Hot-Weather Surprises
- Frequently Asked Questions
Last Updated: October 18, 2026
Step 1: Prep Your Frozen Desserts and Containers Before You Pack
The biggest mistake happens in the kitchen: desserts go into the cooler straight from the freezer with no prep, and you get soft, sweating treats by hour two. At Pepito's Paletas, we build every delivery around one rule: frozen desserts should start colder than you think and be packed tight enough that cold air has nowhere to escape.
Frozen desserts, ice cream, paletas, sorbet, frozen custard, ice pops, each hold cold differently, so prep depends on what you serve.
Here is the prep sequence that works:
- Chill your containers first. Put empty containers in the freezer the night before. A room-temperature pan steals cold from the dessert on contact.
- Pre-scoop or pre-portion. Scoop ice cream into muffin liners or small cups, then refreeze solid.
- Wrap each portion. Heavy-duty aluminum foil or freezer bags keep surface frost from forming.
- Work fast. Pull one tray at a time. Every minute out of the freezer counts.
Pre-Scooping Ice Cream for a Party
Pre-scooping ice cream for a party saves serving time and keeps dessert colder. Scoop portions onto a parchment-lined sheet pan, freeze until firm, then transfer to sealed freezer bags. Guests grab a portion instead of standing over an open tub, so less cold escapes.
Step 2: Pre-Chill Your Cooler and Build a Cold Source Plan
A cooler is only as good as its starting temperature, and pre-chilling is the step most people skip.
How to pre-chill a cooler: Fill a hard-sided cooler with ice or frozen water bottles the night before, close the lid, and let it sit. Dump the meltwater in the morning and reload with fresh cold sources, so your desserts are not fighting a warm box.
Then layer two or three cold sources:
- Ice packs and cooling packs for general chilling
- Block ice for long events, since it melts slower than cubes
- Dry ice for extended transport, handled carefully (see Step 4)
Match the cold source to the duration: a two-hour party needs less than a six-hour festival.
How to Make Ice Stay Frozen Longer in a Cooler
To make ice stay frozen longer in a cooler, fill it to the top, keep it out of direct sun, and open the lid as rarely as possible. Empty space is the enemy: cold air sinks into gaps and escapes when you open the lid. Pack it full and top it off with ice or a towel.
Step 3: Pack the Cooler So Every Dessert Stays Cold
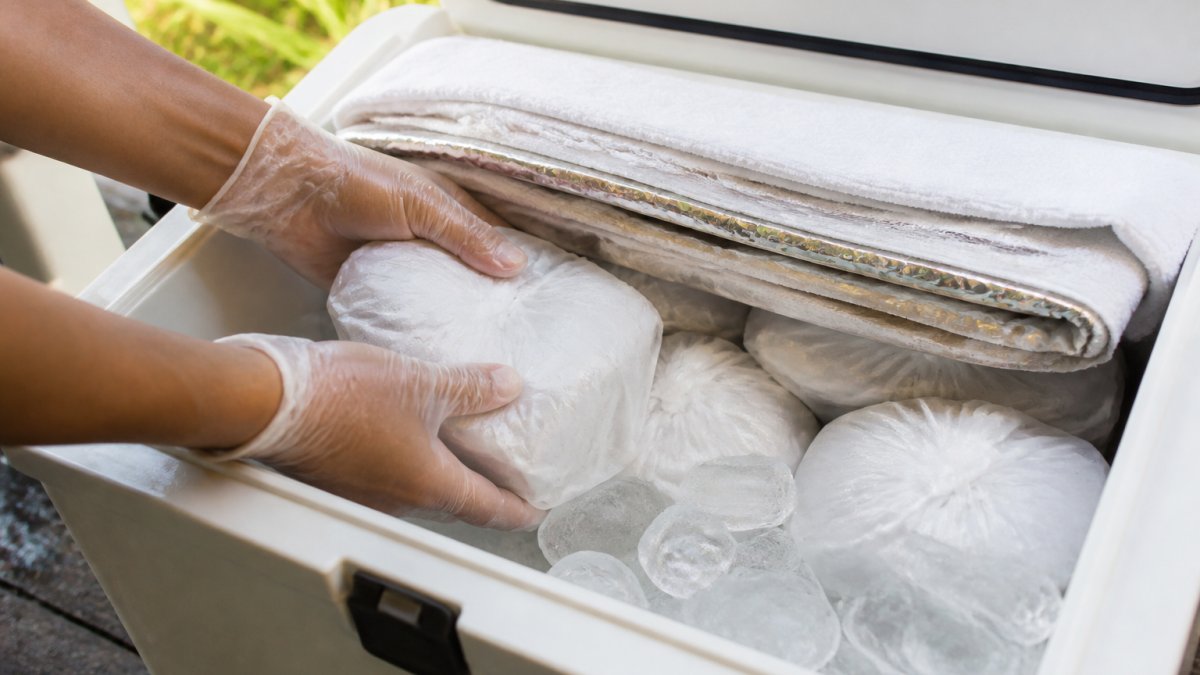
Packing is a cold-distribution problem. Cold settles low, so put your most temperature-sensitive desserts at the bottom and nearest the cold source. Stack in this order:
- Bottom layer: dry ice or block ice, wrapped and separated from food
- Middle layer: frozen desserts in sealed containers
- Top layer: a towel or newspaper for extra insulation
- Gaps: fill every one with freezer bags or crumpled paper
Separate food from direct contact with ice or dry ice. A wire rack or a layer of foil prevents freezer burn and keeps containers from sitting in meltwater.
Traveling with Frozen Food in a Cooler
When traveling with frozen food in a cooler, keep it in the air-conditioned cabin, not the trunk, trunks get hot fast in summer.
Step 4: Using Dry Ice to Keep Desserts Cold (and Doing It Safely)
Dry ice is the strongest cold source for long outdoor events, but it demands respect. It sublimates at roughly -109°F, far colder than water ice, so it can cause severe cold burns on contact and releases carbon dioxide that displaces oxygen in enclosed spaces. Managing these volatile cooling agents requires careful planning alongside other outdoor event logistics, which remain essential when coordinating complex beverage services.
Safety rules that are not optional:
- Never touch dry ice with bare skin. Use tongs or thick insulated gloves. Brief contact can cause a cold burn that looks like a thermal burn.
- Never seal it in an airtight container. Gas builds up and the container can burst. Leave a vent, crack the lid, or use a cooler with a vent.
- Never store it in a closed car or small room. It releases carbon dioxide as it melts, and in a confined space that gas displaces breathable air. Transport with a window cracked and never leave it in a closed vehicle cabin for long.
Food-Contact Barriers and Safe Quantities
The most important rule is that dry ice must never touch food directly. Place it on the bottom of the cooler, then add a barrier, a wire rack, folded towel, heavy-duty foil, or cardboard, before any dessert container goes in.
For quantity, a common pattern is roughly 5 to 10 pounds of dry ice per 24 hours for a well-insulated hard-sided cooler, adjusted for size and ambient temperature.
Transporting Dry Ice Safely
When moving dry ice to an outdoor event:
- Ventilate the vehicle. Crack a window and keep the cooler in the passenger cabin, not a sealed trunk.
- Secure the cooler. Dry ice makes it heavy and shift-prone; strap or wedge it so it does not slide.
- Do not seal the lid airtight. Most hard-sided coolers vent through a drain plug or lid gap; if yours seals tightly, leave the lid slightly ajar.
The FDA food safety guidance treats dry ice as a hazardous material for handling and transport, which is why it needs separation from food and ventilation around it. The USDA food safety guidance also notes that dry ice should not be used in a way that lets carbon dioxide contact the food directly.
For most outdoor dessert service, dry ice is overkill unless the event runs six hours or more or the transport is long. For shorter events, block ice and gel packs are safer and simpler.
Step 5: Set Up an Outdoor Serving Station Without Electricity
An outdoor serving station without power comes down to shade, insulation, and speed. Set the table in shade or under a canopy, keep desserts in the cooler until serving, and bring them out in small batches.
Arrange the station so cold distribution works in your favor:
- Shade first. Direct sun melts faster than warm air.
- Insulate the surface. A towel under the serving tray slows heat transfer from the table.
- Serve in waves. Refill from the cooler instead of leaving everything out.
This is where delivery matters. Pepito's Paletas ships in a patented 8-hour frozen signature box built for exactly this setup: no electricity, no bulky cooler, no last-minute ice run, an entire logistics problem off the checklist for luxury events and office appreciation days.
Step 6: Know Your Temperature Targets and Time Limits
Frozen desserts should stay at 0°F or colder for storage and never rise above 40°F for any extended period. The USDA food safety guidance sets 40°F as the threshold where perishable food enters the danger zone, and frozen treats follow the same logic. But the practical serving window depends heavily on what kind of dessert you are serving, because different frozen desserts fail at different rates.
How Dessert Type Changes the Clock
Not all frozen desserts behave the same outdoors. Here is how the common types compare:
| Dessert Type | Typical Serving Window (shaded, warm day) | What Fails First | Best Cold Strategy |
|---|---|---|---|
| Ice cream (dairy) | 1-2 hours | Softening at edges, then collapse | Pre-scoop and refreeze; serve in waves |
| Gelato | 1-2 hours | Faster melt than ice cream due to lower fat and air | Keep deepest in cooler; serve last |
| Sorbet | 1-2 hours | Iciness and rapid melt at edges | Serve in cups; keep on block ice |
| Popsicles / paletas | 2-3 hours | Dripping, stick softening | Keep upright in a freezer bag on ice |
| Frozen cakes and pies | 2-3 hours | Thawing at center, soggy crust | Keep boxed and insulated; slice to order |
| Dairy-free / vegan frozen desserts | 1-2 hours | Varies by base; coconut and nut bases soften faster | Treat like gelato; keep coldest |
Dairy-free and vegan desserts deserve a note: coconut, nut, or oat milk bases often have lower fat and a different freezing curve than dairy ice cream, so they soften faster at the edges. Keep them at the bottom of the cooler, closest to the cold source, and serve in smaller batches.
Practical Time Limits for Outdoor Service
| Condition | Safe Serving Window | What to Watch |
|---|---|---|
| Cool day, shaded station | 2-3 hours | Condensation on containers |
| Warm day, shaded station | 1-2 hours | Softening at edges |
| Hot day, direct sun | Under 1 hour | Rapid melt, refreeze loss |
| Dry ice transport | 6-8 hours | Ventilation, separation |
Once a dessert fully thaws, do not refreeze it for guests. Quality drops and safety gets murky. Serve what you can keep cold and pull the rest.
A Complete Serving Workflow
Temperature targets only matter if the serving sequence supports them. Run the event in five stages:
- Preparation (night before): Pre-chill containers, pre-scoop or pre-portion, freeze solid, and pre-chill the cooler with ice or frozen water bottles.
- Transport: Load the cooler last, keep it in the air-conditioned cabin, and do not open it during the drive. For long trips, add a towel over the top layer and keep a backup cold source sealed.
- Setup: Place the station in shade or under a canopy, insulate the table with a towel, and bring out one batch at a time.
- Display and replenishment: Serve in waves, refilling from the cooler. Assign one person to serve so the lid is not opened constantly, and sort by melt speed: sorbet and popsicles go out last.
- Leftovers: Do not refreeze anything that has been out beyond its serving window. Return unopened containers to the cooler promptly and discard or keep for personal use anything fully thawed.
Step 7: Troubleshoot Melting, Condensation, and Hot-Weather Surprises
Melting is usually a packing problem, not a weather problem. If treats soften early, check three things: was the cooler pre-chilled, is there empty space, and is the lid opened too often.
Condensation is the quieter issue. Warm air hitting cold containers creates water that soaks packaging and makes everything look messy.
Hot-weather surprises to plan for:
- Wind dries out exposed desserts and blows lids open. Weight them down.
- Direct sun on the cooler raises internal temperature fast. Cover it with a light-colored towel.
- Crowds mean constant opening. Assign one person to serve.
Keeping frozen desserts cold at an outdoor event takes planning, but not a generator or a truck full of ice, the hard part is the timing, the packing, and the moment the sun hits the table.
That is the problem Pepito's Paletas was built to solve. Our minority woman-owned co-op delivers gourmet, made-to-order vegan paletas in a patented 8-hour frozen signature box, so your dessert arrives cold with no electricity and no cooler to manage.
Frequently Asked Questions
How long can frozen desserts stay in a cooler outdoors?
A well-packed hard-sided cooler with a block ice base and minimal lid opening typically holds frozen desserts safely for 4 to 6 hours in moderate weather, and much less in direct sun or temperatures above 90°F. Pre-chill the cooler, fill empty space with extra ice or frozen packs, and keep the lid closed between servings. If you need a full 8 hours outdoors, plan on dry ice or a provider that delivers in an insulated frozen box rated for that duration.
Should you use dry ice to keep desserts cold outdoors?
Dry ice works well for longer events because it stays at about -109°F and lasts far longer than water ice. Handle it with insulated gloves, never seal it in an airtight container, and keep it away from direct contact with the food by placing a barrier like cardboard or a towel between the dry ice and your desserts. In a car or tent, crack a window or vent for airflow. For a 4 to 6 hour party, regular ice plus frozen packs is usually enough.
Can I pre-scoop ice cream for a party?
Yes. Scoop portions onto a parchment-lined sheet pan, freeze until firm, then transfer the scoops to a freezer bag or airtight container and return them to the freezer. At the event, move the pre-scooped portions into a pre-chilled cooler with frozen packs and serve within 2 hours. Pre-scooping cuts serving time, keeps the container closed longer, and makes outdoor service much cleaner than scooping on site.
How do you keep frozen desserts cold at an outdoor party without electricity?
Build a passive cold chain: pre-chill the cooler, layer block ice or frozen packs on the bottom, add a wire rack, and place desserts in a stainless steel pan above the cold source. Insulate with towels or newspaper, keep the station in shade, and only open the lid when serving. For events over 4 hours or in hot weather, dry ice or an insulated delivery box rated for 8 hours removes the guesswork entirely.